Export Reports
Learn how to filter searches and export reports.
Search for Orders
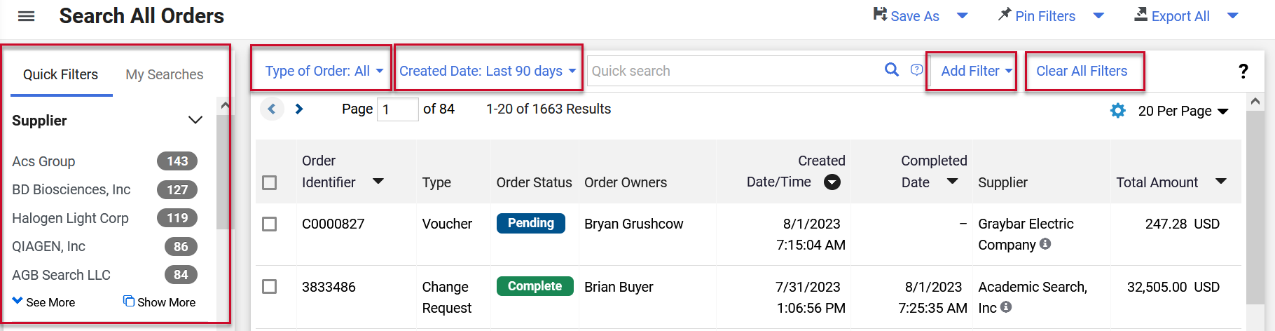
- Navigate to Orders > Search > All Orders.
- Open the Type of Order drop-down menu and select the type of order such as Change Request, Purchase Order, Receipt, Requisition, or Voucher, then select Apply.
- Open the Created Date drop-down menu and specify the date of your search from these options: All, Within, and Between, then select Apply.
- In the Quick Search bar enter keywords and then select the magnifying glass icon to narrow your search.
- Add filters to narrow your search.
- Use the Quick Filters to choose a supplier, business unit, order owner, approved by, commodity code, contract type, participant, pending approver, product flags, status flags, or supplier class.
- Use the Add Filter drop-down menu for additional filters.
- Select Clear All Filters to remove any filters from your search.
Save a Search
- Select the Save As icon to save your search as a favorite. Additional options are available from the drop-down menu.
- The Save Search box displays.
- Insert a Nickname for the search.
- Open the Add Description section to insert text describing this search.
- Select Folder Destination to your Personal or Shared folder. To create a personal folder, select Add New and insert a folder name and description.
- Select Save.
- Navigate to the My Searches tab to find your saved searches.
Pin Filters
- Select Pin Filters to make the current filters you have selected your default layout. Select Yes to confirm your choice.
- You can delete the filters you have pinned in the Pin Filters drop-down menu. Select Remove Pinned Filters and select Yes to confirm your choice.
- In the Pin Filters drop-down menu, select Pin Columns to make the current column view your default layout. Select Yes to confirm your choice.
Export a Report
- Select Export All to export all search results or select Export Selected Rows to only export the orders you have checked.
- An Export Orders box displays. Insert a Title for the results you are exporting.
- Select Submit.
- To view the status and retrieve your export go to the Export All drop-down menu and select Manage Search Exports.
- From the Manage Exports page, select the Export Requests tab.
- Select the Title of your search export to download.
- Select Delete under the Actions column to delete it from the Export Requests tab.
Schedule an Export
- From the Manage Exports page, select the Export Schedules tab.
- Select Create Schedule for…
- Select the Search Type you would like to export.
- The Schedule Export pop-up window appears. Enter the Starts On date, Frequency, and Export Until date.
- Select Save.
- From the Export Schedules tab, select the Edit drop-down menu to make changes, delete, or disable the export schedule.
Create an Export Template
- From the Manage Exports page, select the Export Templates tab.
- Select Create Template for…
- Select the data type you would like to create an export template for.
- Fill out the Export Options, Column Selection, and Template Properties sections.
- Select Submit.
- From the Export Templates tab, select the Edit drop-down menu to edit, make a copy, delete, or share the template.
This HTML version was generated with AI assistance and may contain errors or omissions. The original approved PDF remains the official document of record. An alternative accessible format is available upon request from the document creator in accordance with Title II of the ADA.